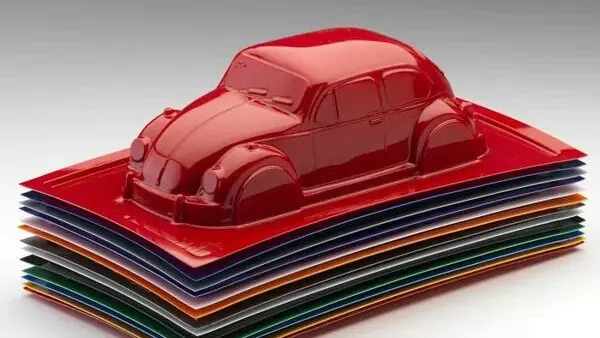
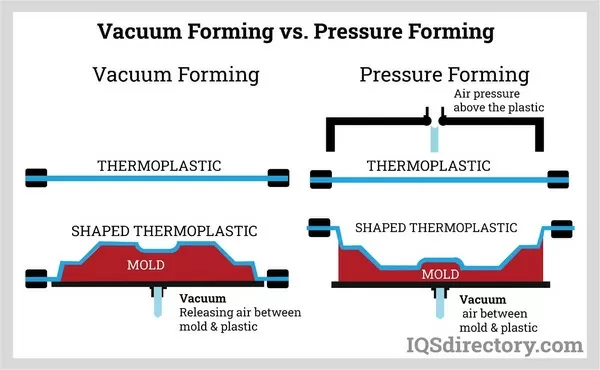
Vacuum forming and pressure forming share a starting point: a clamped plastic sheet is heated until rubbery, then drawn against a mold. The difference is the force that completes the draw. Vacuum forming relies on atmospheric pressure alone, about 1 bar once a vacuum is drawn beneath the sheet. Pressure forming seals a box above the sheet and adds roughly 0.3–1.0 bar on top of that. That single difference changes surface detail, radii behavior, tooling cost, and which applications each route fits. This article covers the mechanics, the tolerances you can reasonably expect, the failure modes specific to each variant, and a selection framework to apply before committing to tooling.
- Vacuum forming pulls heated sheet onto a mold with atmospheric pressure, about 1 bar; pressure forming adds a sealed pressure box supplying roughly 0.3–1.0 bar more.
- Pressure forming reproduces sharper texture, crisper lettering, and tighter radii on the mold side; vacuum forming leaves that surface slightly rounded.
- Both processes run the same heavy gauge material library, from ABS and PC to PVC, PP, and ASA, so material availability rarely decides the choice.
- Pressure forming tooling needs a pressure box, tighter sealing, and stronger clamping, so it costs more — but not automatically double.
- Wall thickness distribution is governed by part geometry and draw ratio in both processes, not by the extra forming pressure.
- Sheet and parts are validated with the same tests either way, including tensile testing per ISO 527-2 and flammability classification per UL 94.
What Is the Difference Between Vacuum Forming and Pressure Forming?
Vacuum forming pulls a heated plastic sheet against a mold using only atmospheric pressure, roughly 1 bar, once air is evacuated from beneath the sheet. Pressure forming seals a box above the sheet and forces it into the mold with about 0.3–1.0 bar of added pressure. Heating, clamping, cooling, and trimming are otherwise identical.
Thermoforming is the umbrella term for all sheet-forming processes of this type; vacuum forming is its most widely used variant, and pressure forming is the upgraded version of the same mechanics. In a vacuum forming cycle the sheet is clamped, heated from one or both sides until it sags a controlled amount, then lowered over the mold while vacuum ports and vent holes evacuate trapped air. Forming force is capped at atmospheric pressure, about 0.1 MPa. That is enough to fill broad surfaces and deep simple draws, but the sheet must be near the upper end of its forming window to drape into fine features before it cools.
Pressure forming keeps the vacuum below and adds positive pressure above, usually in the 0.3–1.0 bar range depending on the machine and part. Total forming force roughly doubles. The practical consequence is not that the part becomes stronger; it is that the sheet can be pressed into mold detail while slightly cooler, which improves texture fidelity, sharpens edges and lettering, and lets designers specify tighter radii on the mold-side surface.
How Does Pressure Forming Improve Surface Detail and Tolerance?
Pressure forming presses the sheet into fine mold features — texture, lettering, vents, tight radii — that atmospheric pressure alone cannot fully fill. The improvement appears almost entirely on the mold side of the part; the free surface keeps the typical thermoforming character and thickness variation.
As a working rule of thumb, vacuum forming needs an inside radius of at least about one sheet thickness to form cleanly, while pressure forming can hold radii closer to half a sheet thickness on the mold side. Texture depth tells the same story: a light vacuum-forming texture comes through soft and rounded, whereas pressure forming can reproduce leather-grain and fine technical textures used on visible equipment housings. Neither number is a spec-sheet value — both depend on material, sheet temperature, and texture geometry — but they set honest expectations at the design stage.
On tolerances, pressure forming does not improve wall thickness distribution. Thinning concentrates at deep corners and high-draw areas in both processes, governed by the draw ratio1 and part geometry. What pressure forming improves is dimensional fidelity against the mold surface: replicated texture lands where drawn, lettering stays legible, and the trimmed outline follows the forming tool on a 5-axis CNC trimming centre. Validate both sheet stock and formed parts with tensile testing per ISO 527-2, which specifies specimen geometry, test speed, and how tensile strength and modulus are reported, so data from different suppliers is actually comparable2.
| Selection factor | Vacuum forming | Pressure forming |
|---|---|---|
| Forming force | ~1 bar (atmospheric) | ~1.3–2 bar total (vacuum + pressure box) |
| Mold-side detail | Rounded corners, soft texture | Sharp texture, crisp lettering, tight radii |
| Tooling | Single mold, faster to modify | Mold plus pressure box and sealing surfaces |
| Sheet range | 0.5–15 mm heavy gauge | 0.5–15 mm heavy gauge |
| Thickness uniformity | Geometry-driven | Geometry-driven, not improved by pressure |
| Typical parts | Trays, liners, guards, structural covers | Equipment housings, cosmetic enclosures, panels |
"Pressure forming tooling always costs twice as much as vacuum forming tooling."False
The forming mold itself is often similar for both variants; the added cost comes from the pressure box, sealing surfaces, and stronger clamping, not from rebuilding the mold. The premium shrinks on large enclosures and grows on small, detail-heavy parts.
"A first-article approval does not guarantee stable wall thickness in production."True
Sheet gauge variation, oven zoning drift, and ambient changes shift the forming window between runs. Critical sections should be thickness-mapped periodically instead of trusting one approved T1 sample [^t1].
Which Materials Suit Each Process?
Both processes draw from the same material library, because the forming mechanics differ far less than sheet behavior does. ABS is the workhorse for equipment housings and automotive interior parts, with a wide forming window and stable detail reproduction. PC brings impact resistance and clarity to guards and protection covers but runs hotter, so its heat deflection temperature3 — defined by ISO 75-2 as the point where a loaded plastic bar deflects a specified amount — matters when the part sits near heat sources. PVC remains common for trays, packaging, and industrial liners; PP suits automotive interiors and reusable trays; ASA earns its place on outdoor enclosures for weatherability.
Flammability is often the deciding filter for enclosures rather than formability: UL 94 classifies how plastic materials burn, and many formed equipment housings must meet a specified rating before they are accepted into an electrical assembly4. The SPE Thermoforming Division publishes practical guidance on forming windows and material behavior that is worth reviewing before locking a material choice.

ZetarVac processes sheet from 0.5 to 15 mm and forms parts up to about 2,500 mm long, with 20+ vacuum forming and thermoforming machines in the plant. Large curved housings and deep-draw industrial parts can therefore run in either variant without leaving the sheet range or forming length the tooling was designed around.
Where Does Each Process Fail?
Failure modes overlap but the visible signatures differ. In vacuum forming the classic defects are webbing or bridging across deep draws, excessive thinning at corners when the draw ratio is pushed, and chill marks where the sheet meets the mold too cool. Pressure forming adds its own signature failure: incomplete texture fill, where the surface looks washed out because the sheet entered the detail below its forming temperature or the pressure ramp was too slow. Trapped air from insufficient venting shows up the same way in both — a feature that formed soft because air had nowhere to escape.
The counterintuitive part is that more pressure does not fix a cold sheet. Forming force compensates for marginal detail depth, not for material that has already stiffened; pushing pressure against an underheated sheet increases corner thinning and hides the real problem. Screening should happen before tooling: as a general engineering range, single-step vacuum forming without plug assist starts struggling beyond a draw ratio of roughly 2:1, while plug assist or added pressure extends the practical window. One mold-inspection habit worth adopting is checking vent hole condition — blocked vents reproduce exactly the soft-detail defects that get misdiagnosed as pressure problems.
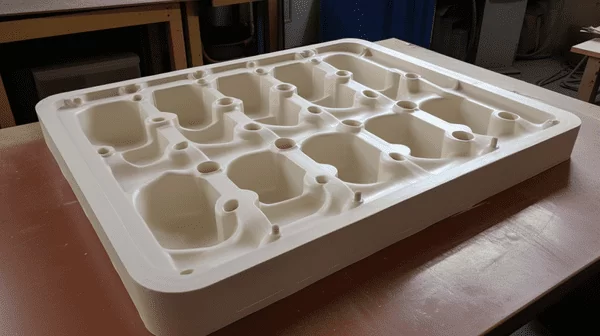
"Poor texture reproduction always means the pressure box is undersized."False
The most common causes are sheet temperature below the forming window, texture depth that the local radii cannot fill, and blocked or undersized vent holes. Raising pressure against a cold sheet adds thinning and chill marks without recovering the detail.
"Texture depth should be reviewed against local part radii before tooling is cut."True
Deep textures need enough local radius and forming temperature to fill completely. Reviewing the texture specification at design review costs a meeting; discovering washed-out texture on the first article costs a tool rework cycle.
A practical review sequence keeps these risks contained: confirm the texture specification against local radii at design review, thickness-map the first article rather than judging it by eye, and re-inspect vent condition whenever a detail defect reappears after a tooling or sheet-supplier change.
ZetarVac supports prototyping, small batch, and large batch production with a reference monthly capacity of about 100,000–200,000 pieces. A texture or radius risk can therefore be checked on prototype tooling before production molds are committed, instead of being resolved through rework on serial tools.
How Do You Choose Between the Two Processes?
Choose pressure forming when the mold-side surface is cosmetic and carries texture, lettering, or tight radii that users see and touch. Choose vacuum forming for trays, liners, guards, and structural covers where the surface is functional rather than visible.
Work through three filters. First, surface: if a customer handles the part — medical equipment housings, retail display covers, consumer-facing panels — pressure forming usually justifies its tooling premium. Second, geometry: deep simple draws and heavily thinned sections favor vacuum forming, since extra pressure cannot rescue a poor draw ratio. Third, iteration: vacuum forming tools are faster to modify, so early-program parts with likely geometry changes are cheaper to iterate as vacuum tools, converting to pressure later only if the detail requirement survives design freeze.
Where the part sits in its program matters as much as the part itself. During supplier selection, ask bidders to state which variant they are quoting, what forming pressure the machine can deliver, and how trimmed outlines will be held — the answers reveal more about capability than a price line. For a broader view of how heavy gauge thermoforming fits alongside other molding and finishing routes, the ZetarVac service overview lays out the full capability set.
FAQ
Can pressure forming improve wall thickness uniformity?
No. Thickness distribution is controlled by part geometry, draw depth, and sheet temperature, and the extra pressure does not redistribute material. Pressure forming improves detail reproduction on the mold side, while uniformity is managed through design, pre-stretch, and sheet selection.
Is pressure forming slower than vacuum forming?
Only marginally. Sealing the pressure box and building pressure add seconds at most, while the cycle is dominated by heating and cooling the sheet. On thick heavy gauge sheet, cycle times between the two variants are close enough that speed should not drive the decision.
Which materials are suitable for both processes?
Nearly the whole heavy gauge library: ABS, PC, PVC, PP, HDPE, PMMA, PC/ABS, ASA, and glass-filled PP all form in both variants. Because pressure forming presses the sheet into detail while slightly cooler, materials with narrow forming windows often benefit more from the added force.
Can one tool run both vacuum forming and pressure forming?
Often yes, if the mold was designed with a compatible pressure box interface. Converting a vacuum forming mold to pressure forming requires sealing surfaces and clamping strength rated for the added pressure, so it is a design decision at tooling stage, not a retrofit to assume. For related process distinctions, see the guide on the difference between thermoforming and vacuum forming.
Does pressure forming leave marks on the non-mold surface?
It can. The free surface of the sheet contacts the pressure plate or membrane, which may transfer a faint texture to that side. For parts where both surfaces matter, the material choice and pressure-plate finish need review at design stage. The ZetarVac vacuum forming capability page is a useful next stop to explore sheet ranges, materials, and forming capacity in more depth before comparing suppliers.
-
Draw ratio: The ratio of formed part depth to the narrowest mold opening width, used to screen thinning and webbing risk before tooling. ↩
-
ISO 527-2: The standard tensile test method for plastics, specifying specimen geometry and test speed so thermoformed sheet data is comparable. ↩
-
HDT: Heat deflection temperature per ISO 75-2, the temperature at which a loaded plastic bar deflects a specified amount. ↩
-
UL 94: The flammability classification standard for plastic materials, frequently required for formed equipment enclosures. ↩